
1. INTRODUCTION
Teaching and studying temporal bone anatomy pose challenges for both lecturers and medical students. The temporal bone houses complex and minute internal structures, making it difficult for students to understand the real-life 3D architecture of each anatomical structure using traditional methods such as lectures and 2D drawings. A study found that 96% of neurosurgery residents favored using a 3D model over a 2D resource, with 93% agreeing that the 3D model made understanding the complex temporal bone anatomy easier [1]. Furthermore, available 3D temporal bone models have limitations because the irregular geometry of the bone cannot be accurately replicated using casting techniques. Studying temporal bone specimens on cadavers can help address this issue; however, the resources and skills required for dissection are not always available [2]. Moreover, highly infectious diseases such as hepatitis B and C viruses, Mycobacterium tuberculosis, and prion disease can be transmitted during the dissection of the temporal bone from a cadaver [3–5]. One study recommends preserving fresh frozen cadaveric temporal bone specimens for dissection training, while utilizing 3D-printed models and virtual reality simulators to educate junior learners [6]. Recently, the development of computer-based anatomical databases has enhanced students’ learning efficacy through virtual interaction [2]. However, learners struggle to grasp the spatial orientation of the structures without a physical 3D model, which offers richer learning experiences and foster long-term knowledge through visualization and tactile engagement by handling and assembling the parts [8].
A physical 3D model of the temporal bone can be created by either casting or 3D printing. Casting involves complex procedures and exposure to various chemicals [9]. In contrast, 3D printing is preferred because it is more convenient, flexible, less time- and labour-intensive. Thus, we describe the affordable process of creating an assemblable, 3D-printed temporal bone model with transparent material and multicolor internal structures to teach ear anatomy.
2. MATERIALS AND METHODS
The process of creating a 3D-printed temporal bone model comprises three stages: (1) image acquisition and processing, (2) 3D printing, and (3) post-processing.
Computed tomography (CT) scan images of an anonymous patient were obtained using a convenience sampling technique. The patient had previously been prescribed a nasal sinus CT scan by an otolaryngologist to evaluate a suspected diagnosis of chronic rhinosinusitis. The temporal bone images were acquired as part of the standard nasal sinus CT scan protocol, without requiring any alterations, as the region of interest was already included in the routine imaging coverage. The patient provided written consent, and the use of the medical imaging data was approved by the Institutional Review Board (IRB) of the University of Medicine and Pharmacy at Ho Chi Minh City under the reference number 509/HĐĐĐ-ĐHYD, IRB-VN01002/IRB00010293/FWA00023448.
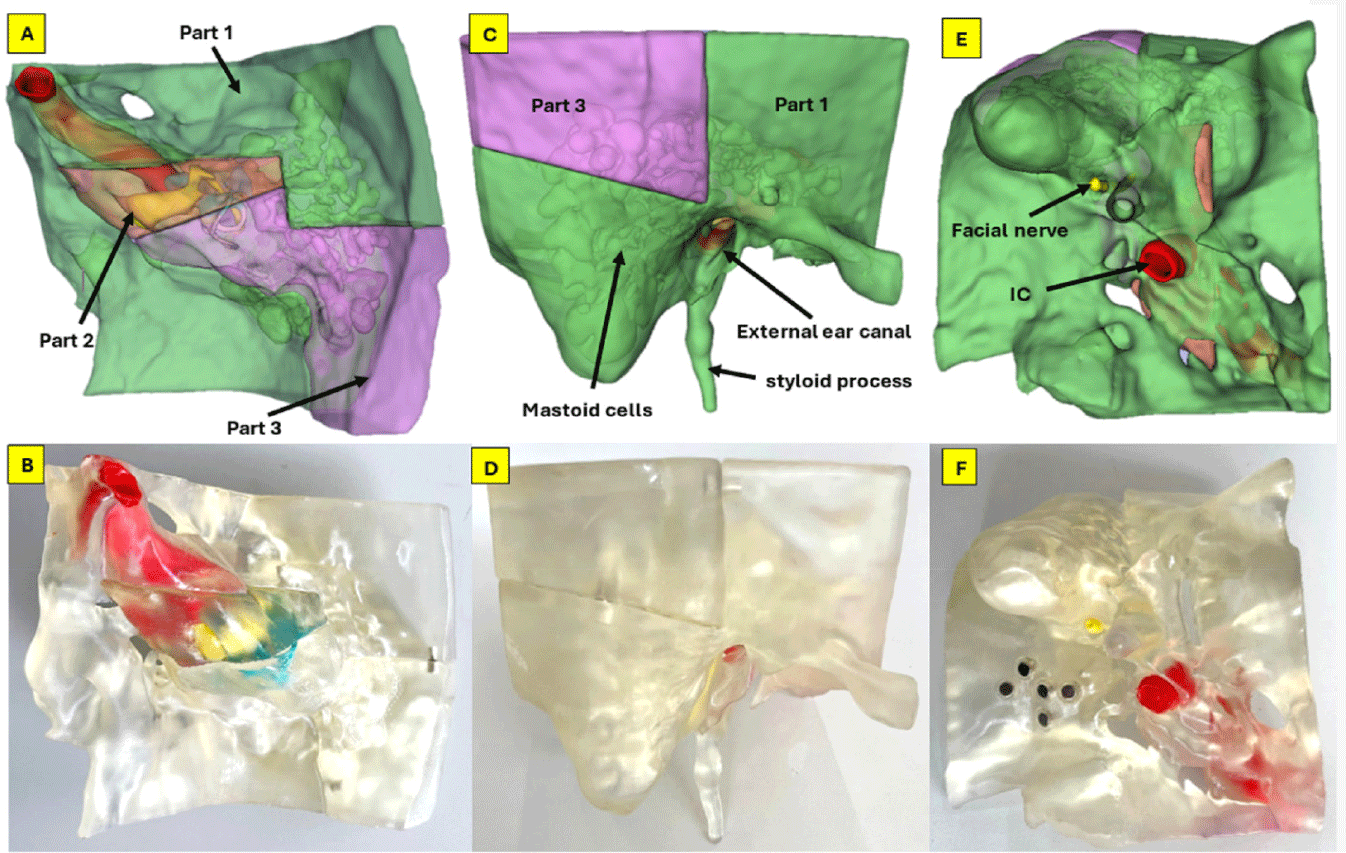
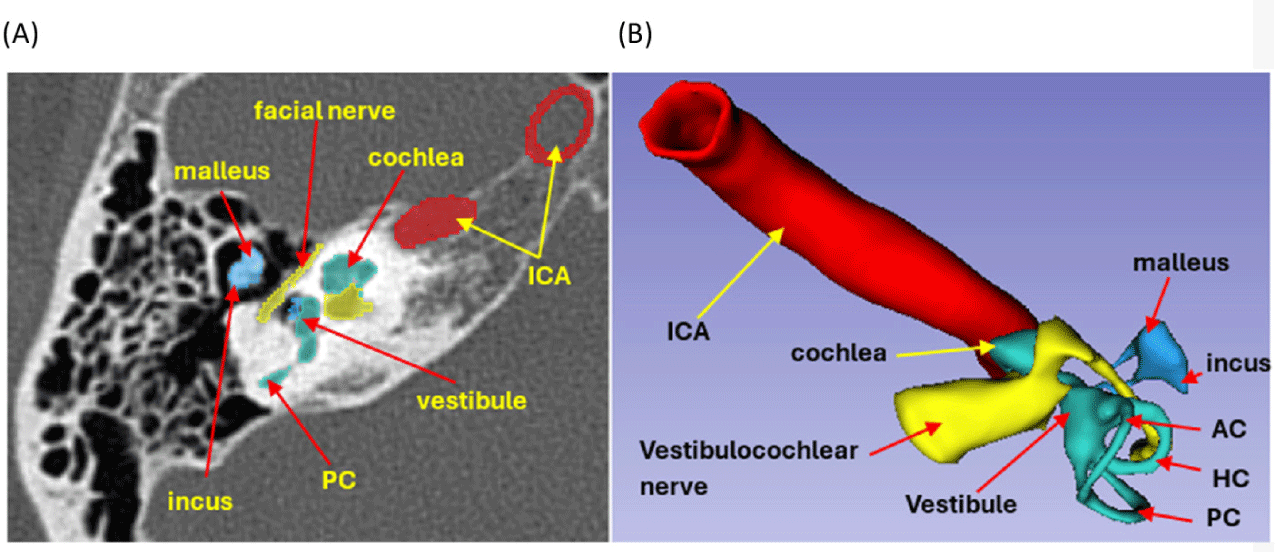
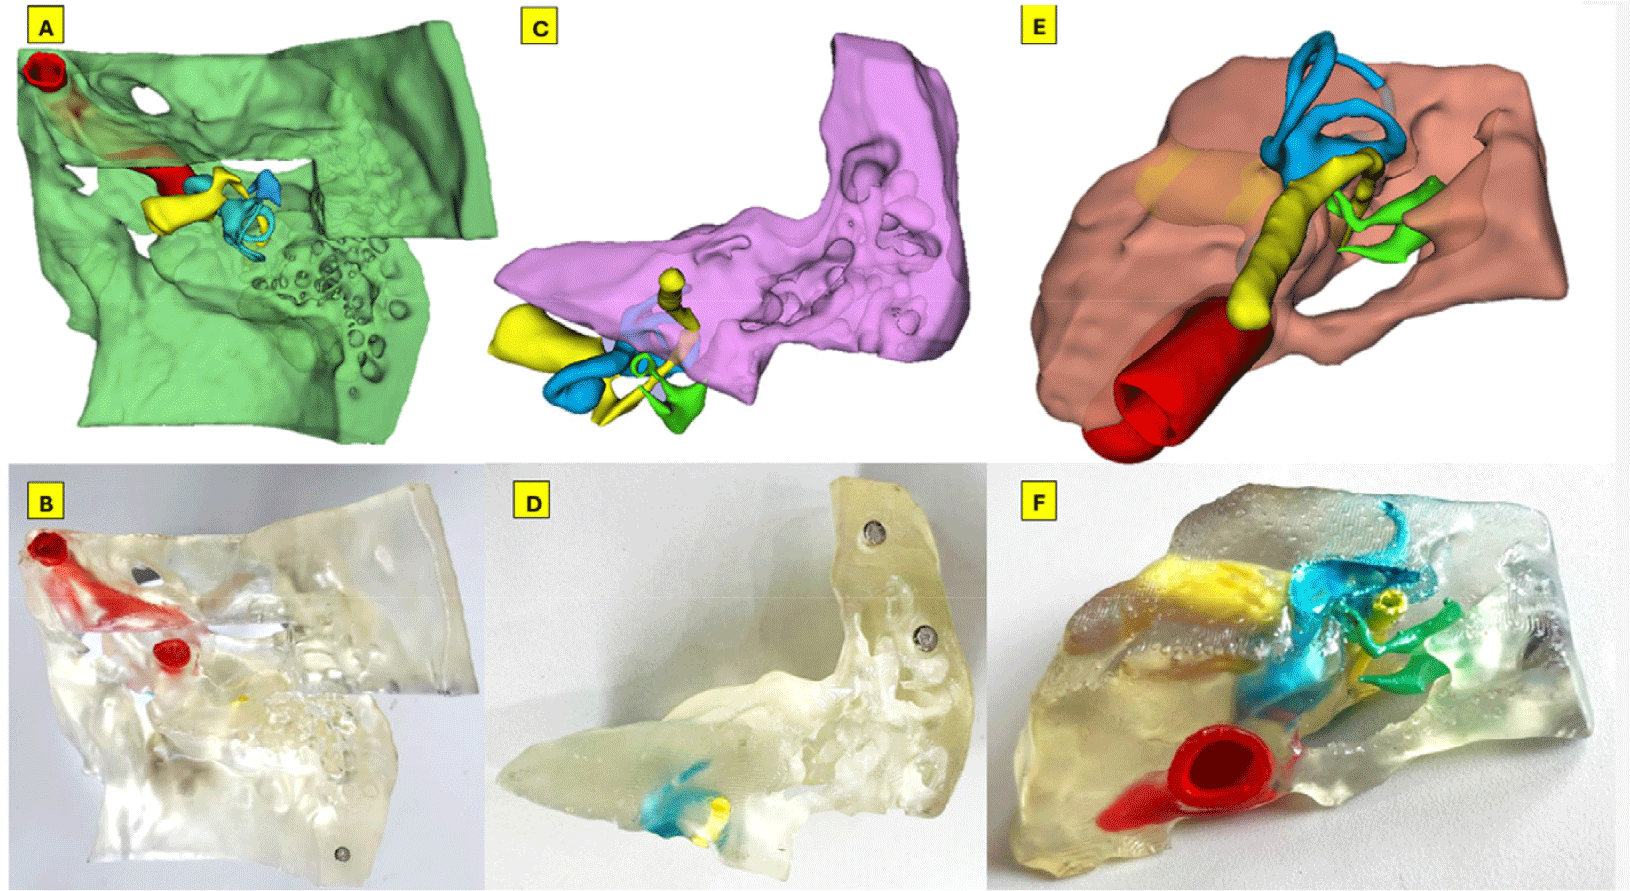
CT images in Digital Imaging and Communications in Medicine (DICOM) format of the right temporal bone, confirmed to be free of pathology, were obtained using a 128-slice Siemens CT scanner. The scan was performed at a tube voltage of 140 kilovoltage peak (kVp) with a voxel resolution of 0.232×0.232×0.4 mm. The DICOM imaging data were fed into 3D Slicer V5.6.0 software, an open-source platform for medical image processing and three-dimensional visualization [10]. The 3D segmentation process involved delineating anatomical structures using CT scan images in DICOM format. Segmentation of structures was executed within the desired upper and lower thresholds of the Hounsfield unit (HU) radiodensity, which varies across anatomical structures. We constructed 3D models of the temporal bone, mastoid air cells, ossicular chain, facial nerve, vestibulocochlear nerve, labyrinth, and internal carotid artery, which were located within the petrous part of the right temporal bone and were manually segmented at a radiodensity ranging from –350 to 1,100 HU using tools such as Thresholds, Paint, Island, Scissors, Hollow, Logical operators. The temporal bone was then separated into three parts, as shown in Fig. 1, facilitating the observation of the internal structures. The 3D digital model was imported into Meshmixer V3.5 software for further refinement, smoothing, and designing magnetic joints. The labyrinth, facial nerve, and vestibulocochlear nerve were hollowed out for dye injection. Final data were exported in stereolithography (STL) format for 3D printing (Fig. 2).
The finalized 3D digital model was transferred into Chitubox slicing software, which converts the 3D data into geometric code (G-code). These commands instructed the 3D printer to accurately print each layer by solidifying liquid resin through photopolymerization. The resin 3D printer (Saturn 3 Ultra 12K, ELEGOO, Shenzhen, China) was employed for this process. The printer utilized masked STL (MSLA) technology and an array of light-emitting diodes (LEDs) as the UV light source. The UV light, with a wavelength of 405 nanometers, was projected through an LCD mask to solidify a complete layer of liquid resin. This process was repeated layer by layer until the model was fully completed. The model was printed using transparent resin (Crys 100, Magforms Technology, Guangdong, China) with a layer height of 0.15 mm.
Post-processing after 3D printing included surface treatment, painting, and magnet attachment. The model was left on the build plate for 20 minutes to facilitate the drainage of residual liquid resin. It was then thoroughly washed with 90% isopropyl alcohol for 15 minutes and cured with ultraviolet (UV) light in a washing and curing station (Mercury XS Bundle, ELEGOO), equipped with 14 UV LED lights and a rated power of 36 W, for 5 minutes to harden any remaining liquid resin.
The structures exposed in the tympanic cavity, such as the ossicular chain and the second segment of the facial nerve, were first painted with primer paint (P07 White 1500, Raditz Studio, Bangkok, Thailand) using a paintbrush and allowed to dry for one hour. Primer paint prepared surfaces for color painting by enhancing color adhesion, filling imperfections, providing a uniform base, and improving durability and appearance of the model. Next, acrylic paint (Tamiya, Tamiya Shoji, Shizuoka, Japan) was applied to these structures and allowed to dry for one hour. The mentioned primer and acrylic paint are commonly used for coloring photopolymer resin 3D-printed models.
On the other hand, the structures hidden within the petrous part of the temporal bone, such as the carotid artery, the facial nerve, the semicircular canals, and the cochlea, were hollowed out and intentionally designed with a 2-mm opening for the injection of paint. They were then filled with acrylic paint diluted with distilled water in a 1:1 ratio to reduce viscosity, using a 20G syringe, making them recognizable through the transparent shell of the bone. After injection, the openings were sealed by applying a small amount of transparent liquid resin with a tiny brush, which was cured using handheld UV light (6 W power rating) for two minutes at a distance of 5 cm.
Then, the model was inspected to ensure there were no leaks of liquid color. The magnets were assembled into the three parts of the model, and finally, two layers of glossy paint (ATM A10 CLEAR, Urai Phanich, Thailand) were applied to the model’s surface to enhance transparency. The printer, materials, and equipment used in the process of producing the model are easreadily available on all online commercial platforms in Vietnam.
3. RESULTS
The printing process took four hours and 320 grams of transparent resin for the temporal model. The model measures 140 mm in medial-lateral dimension, 122 mm in anterior-posterior dimension, and 125 mm in inferior-superior dimension, which is 200% of the actual scale.
Regarding the external view, the overall shape of the 3D-printed model resembles the anatomy in the 3D rendering. The styloid process, stylomastoid foramen, carotid canal, sigmoid sinus, external auditory canal, and internal auditory canal can be clearly identifiable (Fig. 1). The model is divided into three parts to observe the internal structures. The hollowed structures are clearly visible through the transparent bone (Fig. 3). The breakdown of manufacturing costs and time is shown in Table 1.
4. DISCUSSION
CT scans are often preferred to obtain image data because the contrast between bone and soft tissue is higher than that of MRI, which makes 3D segmentation more faborable. Most studies have used CT scan slice thicknesses ranging from 0.23 to 0.63 mm [11]. In cadavers, where radiation is no longer a concern, micro-CT allows for slice thicknesses as small as 0.012 mm [11]. A study that used micro-CT with a voxel size of 0.156×0.156×0.25 mm showed that the size of the 3D-reconstructed stapes from the scan matched the actual one during surgery [12]. Our study used a CT scan of an actual patient with a slice thickness of 0.4 mm and a transaxial resolution of 0.232×0.232 mm, which provided acceptable 3D image quality for anatomical observation.
3D segmentation can be achieved by either a semi-automated or manual process. Manual segmentation is a time-consuming task but crucial for accurately delineating soft tissue structures. Several studies have reported using semi-automatic segmentation of the bone volume based on HU thresholds in CT scan images; nevertheless, many intricate anatomical structures, such as the facial nerve, semicircular canals, vestibule, often require manual segmentation [13–15]. In our study, an experienced otolaryngologist and radiologist manually performed the entire segmentation process, which took four hours to complete. Furthermore, fully automated segmentation by artificial intelligence (AI) is an emerging field with promising preliminary results [16,17]. AI has great potential to save time, manpower, and costs associated with 3D reconstruction. The role of humans reviewer is to assess the AI’s results and provide necessary corrections. In Neves’ research, AI reproduced 3D models with high accuracy while requiring only 4 to 7 seconds to reconstruct a structure [18]. Undoubtedly, AI-driven 3D reconstruction using AI is poised to become an inevitable trend in the future.
There are many 3D printing technologies and materials available, including thermoplastic filament, liquid resins, and powder. Fused deposition modeling (FDM) utilizes thermoplastic filament and offers the lowest operating cost, at under $5 per temporal bone model. However, it has lower printing accuracy, a rougher surface quality, and lack the capability to print transparent materials [11] The most common materials used for temporal bone models are polylactic acid and acrylonitrile butadiene styrene [19,20].
Polymer photocoagulation, on the other hand, utilizes UV light to solidify liquid resin, and comprises two primary technologies. Inkjet printers can simultaneously produce models in multiple colors and materials with varying mechanical properties. As a trade-off, they incur extremely high production costs, which can reach up to $400 per model [11]. The temporal bone model manufactured by Phacon GmbH (Leipzig, Germany) has been validated for anatomical realism, usefulness as a training tool, task-specific applicability, and overall user feedback, but its price exceeded $300 at the time of writing.
In contrast, the vat photopolymerization printer (specifically MSTL, or MSLA) is limited to printing with a single type of liquid resin but offers several advantages, including the ability to produce transparent materials, affordability, and high accuracy. A study concluded that a photopolymer resin model produced using MSLA 3D printing technology is superior to FDM-printed models made of polyethylene terephthalate glycol and Simubone material in terms of anatomical accuracy and the surgeon’s dissection experience, with a production cost of just $27. In comparison, the initial equipment investment and per-unit cost for creating our model are only $589 and $20.3, respectively (Table 1).
The three parts of our model were printed simultaneously and attached with magnets. The vestibulocochlear nerve, facial nerve, and labyrinth are deeply embedded in the temporal bone; therefore, these structures had to be hollowed out and injected with colored dye. The carotid artery and ossicles were painted with a small brush. The entire painting process took 2 hours. Using this technique, we successfully produced a transparent temporal bone model with colorized middle and inner ear structures. The result is comparable to those printed using inkjet technology.
The dimensional accuracy of the printed model relies on all stages of image processing, 3D printing, and post-processing. One limitation of our study was that we did not evaluate the geometric accuracy of the printed model. In our study, both an otolaryngologist and a radiologist independently performed the segmentation. According to the manufacturer, the printer has an XY resolution of 19×24 μm, which is sufficient for anatomical models intended for visualization purposes. During the post-processing stage, we followed the standard protocol for resin printing, including washing with 90% isopropyl alcohol (IPA) and UV light curing using a standard washing and curing station.
Currently, there are two methods for validating the accuracy of 3D-printed models. The first is an objective method, which involves 3D scanning of printed models and comparing them to the original designs derived from CT scans. A study used light-based surface scanning to assess the accuracy of 3D-printed bone models, demonstrating that MSLA technology from the same printer manufacturer yielded a mean deviation of 0.13 mm and a standard deviation of 0.16 mm [21]. However, light-based surface scanning cannot capture the intricate, irregular geometries located deep within the temporal bone, necessitating volumetric imaging such as CT scanning. While larger surfaces and bony structures were generally reproduced accurately in models, smaller and more delicate features, such as the ossicles, proved challenging to replicate [22,23].
The second method is subjective validation, which involves surgical simulation, assessing dissection experience, morphological accuracy, clinical applicability, and anatomical teaching value. One study reported that 3D-printed temporal bone models achieved sub-millimeter accuracy when compared to the original scans, as validated by a senior otolaryngologist [24]. Four studies have evaluated the suitability of different types of materials in simulating the mechanical properties of temporal bones by assessing material stiffness and drilling sensation experienced by surgeons during surgical simulation [25–27,15]; these three studies considered resin to be the most suitable material [25,27,15]. However, most research has focused on producing life-sized temporal bone models specifically for surgical training in otolaryngology. In our study, we produced a 200-percent scale model to address the lack of realistic 3D models for teaching anatomy courses to undergraduate medical students. Therefore, evaluating the dissection experience was beyond the scope of this study. Learning temporal bone anatomy remains challenging, even for postgraduate students. Conventional casting models provide only a cross-sectional perspective and fail to fully illustrate the anatomical relationships beyond a single plane. The key strength of our 3D-printed temporal bone model is its three assemblable parts, which offer an enhanced view of the colorful internal structures within a transparent bone shell. The combination of tactile and visual perception enhances long-term spatial memory by allowing users to handle, assemble, and disassemble the physical parts. Moreover, our CT scan-based reconstructed model replicates real anatomy exactly, whereas traditional models and atlases are designed by skilled artists. However, a limitation of our model is the necessity for magnification to facilitate painting and dye injection. Printing tiny hollow structures at the actual scale would hinder the injection of colored fluids. Based on evidence from previous studies, we believe that our 3D printed temporal bone model offers acceptable accuracy for anatomical teaching purposes. Future research should focus on validating the model through both objective and subjective methods.
5. CONCLUSION
Our 3D-printed model provides an affordable and efficient solution for observing the complex anatomy of the temporal bone, which is difficult to visualize using a two-dimensional atlas or cast model. 3D reconstruction using AI is expected to become a standard approach in the future. UV resin printed via vat photopolymerization technology offers the most suitable and cost-effective method for simulating the mechanical properties of bone and providing transparency. 3D printing allows for the customization of anatomical learning materials, such as assemblable components and rare pathology models. Future research should focus on assessing the effectiveness of our 3D-printed temporal bone models in enhancing anatomy education and learning.